This week's craft MIGHT be my favorite so far.
Seriously, if you had been in my house last night, you would have seen me downright GIDDY with joy at my creations. In less than 1.5 hours, I added these amazing new coasters to my living room!
I have had a tutorial for these pinned on Pinterest for months, and then a couple weeks ago, I found another tutorial when I was Stumbling Upon the internet. I was like, "Oh yeah, I totally want to make those" and then barely gave them a second thought. And then last week, my sister Suzy called me from Hobby Lobby asking me what kind of Mod Podge to buy to make tile coasters and I said "Okayyyyy I'll make them myself already!"
For this project you need:
4x4 Ceramic Tiles
Scrapbook Paper
Mod Podge
Felt (1 sheet for every 4 coasters you're making)
Foam Brush (or other Mod Podge applying apparatus)
Turns out I invested exactly $1.91 to make a set of 5 tiles. I purchased bone-colored 4x4 tiles from Home Depot for $0.16 each (you can buy white for the same price or black for $0.39) and I purchased two pieces of felt from Hobby Lobby for $1.
The scrapbook paper I already had, from a safari-themed set I purchased last year on clearance at Micheals . . . I had the best intentions to use the scrapbook paper to accent my living room (which is FILLED with pictures from my two adventures in Uganda) but last night was the first time I even broke the sticker seal on the pack of paper. I knew I would use it SOMEDAY and I was THRILLED to finally have the chance. And the Mod Podge I already had as well . . . I mean, doesn't everyone have an orange jar in their craft box?
The first step was to pick the paper. It was difficult to narrow down 18 choices to 5 that complimented each other well, but I think I did pretty well.
The next step was to cut the paper to fit the tiles. This amazing elephant paper was my favorite, and I wanted that elephant to be perfectly centered on the tile, so I went about trimming that one to size first.
I knew I wanted a small border of tile, so I kept trimming and trimming (and trimming) until the elephant was perfect. This took quite a bit of work. After each trim, I'd lay the paper on the tile, decide where to trim next, and start over again. I'll save you the work and tell you that if you want a border (and why wouldn't you), you want your paper to measure 4x4 EXACTLY.
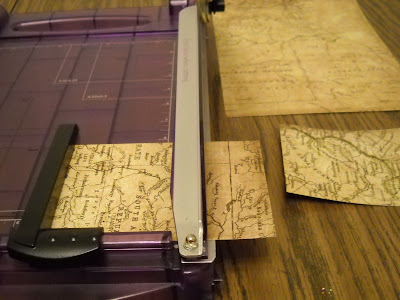
Once I'd found the magic measurement, I set the guides on my fancy paper cutter (a hand-me-down from my UBER-crafty mama) and snipped away at the remaining 4 pieces of paper. I paid close attention to which PART of the paper I wanted, and cut accordingly.
Next, I cut the felt. Again, I had to determine what SIZE I needed before I did any cutting. This was much easier, as I needed the felt to cover the entire bottom of the tile. So I measured the tile on the cutting board (each tile is actually 4 1/4 x 4 1/4 inches) and set the guide on the paper cutter and cut away. I was able to get 4 squares from each piece of felt.
Then it was time to apply the paper to the tiles. First, a coat of Mod Podge on the tile, and then centered the paper on the tile. Move it around if you have to until it is perfect!
I did this with all 5 tiles, and then went back to do a coat of Mod Podge over the top of the paper (waiting maybe 5 minutes) on each tile. First, I pressed out any air bubbles that had popped up and then after the top coat, I pressed out more air bubbles as they came. Don't worry that the Mod Podge looks white at this step; it will dry clear.
After all 5 had their top coat, I went back and did one more coat of Mod Podge (again, waiting maybe 5 minutes).
When I was done, I had 5 adorable safari tiles!
I let these dry for about 30 minutes (while I began packing for my business trip to Chicago). By then, they were dry to the touch. It was time for the felt backing! I flipped the first tile over and gave the bottom a generous coat of Mod Podge and then pressed the felt firmly onto the bottom. I made sure to press along the edges to make sure the felt wouldn't lift once it dried.
Within minutes . . . this was what I had!
That elephant is seriously my favorite!!
Are they not AMAZING????? I was SO pleased and SO proud and SO impressed and SO happy. And it only took me 1.5 hours!! And I did all the hard work measuring work for you, so your coasters will be done in even LESS time!!
Now for the disclaimer--I read on both tutorials I'd seen that it takes 1 month for the Mod Podge to cure before you can put hot beverages on the coaster without ruining it. You can bypass this by using a clear spray gloss or glaze or varnish, but I wanted the brush-stroke texture that you get from Mod Podge, so I will just be careful not to put my coffee mug on new coasters for a few weeks :)
Okay, now go make tile coasters!! Seriously!!
Till next week,
~~Jaynie~~


No comments:
Post a Comment